Scraping SA Dam(n) Data using a Scheduled Lambda and uploading it to Mongo
Lately, it has been raining quite a lot, which got me wondering about the current dam levels at the Vaal Dam. Aside from hearing updates through word of mouth or some Facebook group, how could I find out the current dam levels? A quick Google search for “SA Dam Levels” directs you to the “Weekly State of Dams” webpage on the Department of Water and Sanitation’s website.
The landing page presents a map of South Africa. Clicking on a province displays a table similar to the one below:
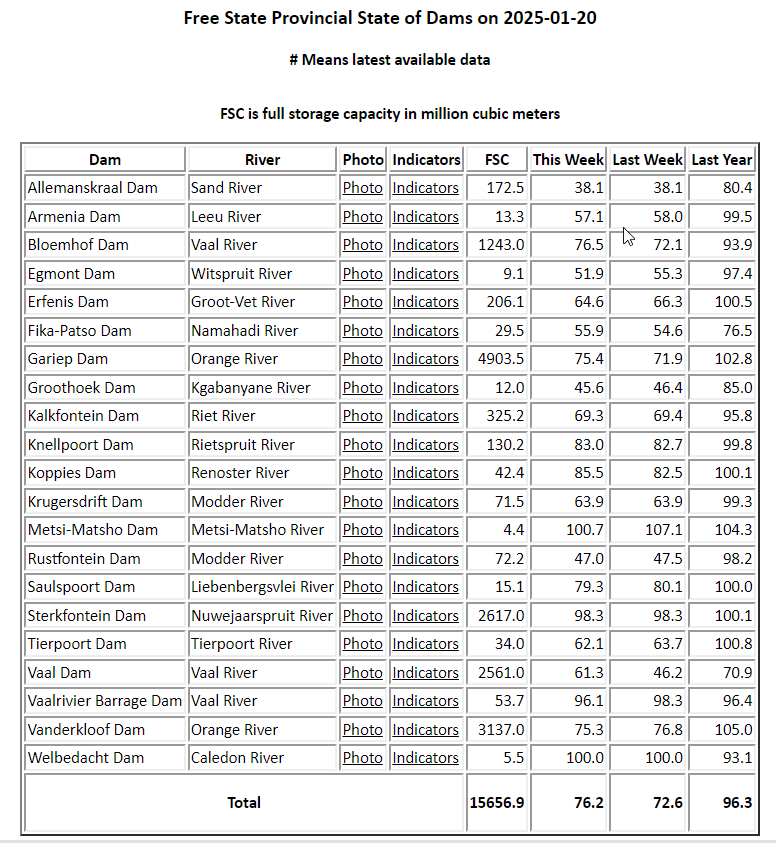
How cool! Here we have all the dams in the Free State. I noticed that the report is dated 20 January. Judging by the “this week” and “last week” columns, the report seems to be updated weekly, likely released every Monday. While the column headings are somewhat vague, “this week,” “last week,” and “last year” indicate how full the dams are as percentages. Interestingly, a dam can exceed 100% capacity! The “Full Storage Capacity (FSC)” column is also noteworthy—look at the immense size of the Gariep Dam! Another intriguing detail is that each dam has an associated photo. However, I’m uncertain if these are updated weekly. It would be fascinating if there were a camera on-site capturing weekly images of each dam. This is something I still need to confirm.
Here is the photo associated with the Gariep Dam:
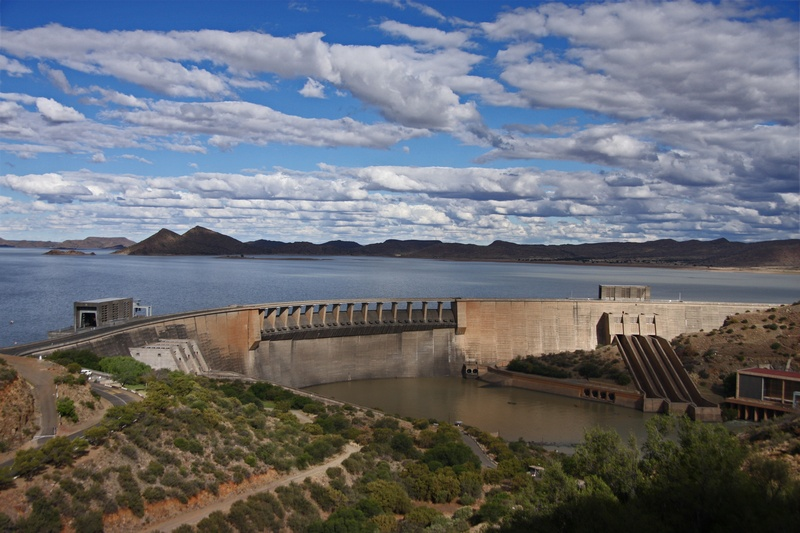
I’ll keep an eye on those clouds! If they appear unchanged next week, I might confirm whether or not my hypothesis is correct.
Regardless, it’s clear that this is valuable information. Surely, there must be an interactive dashboard for this data!
While browsing the website, I discovered something called the “Surface Water Map,” which looks like this:
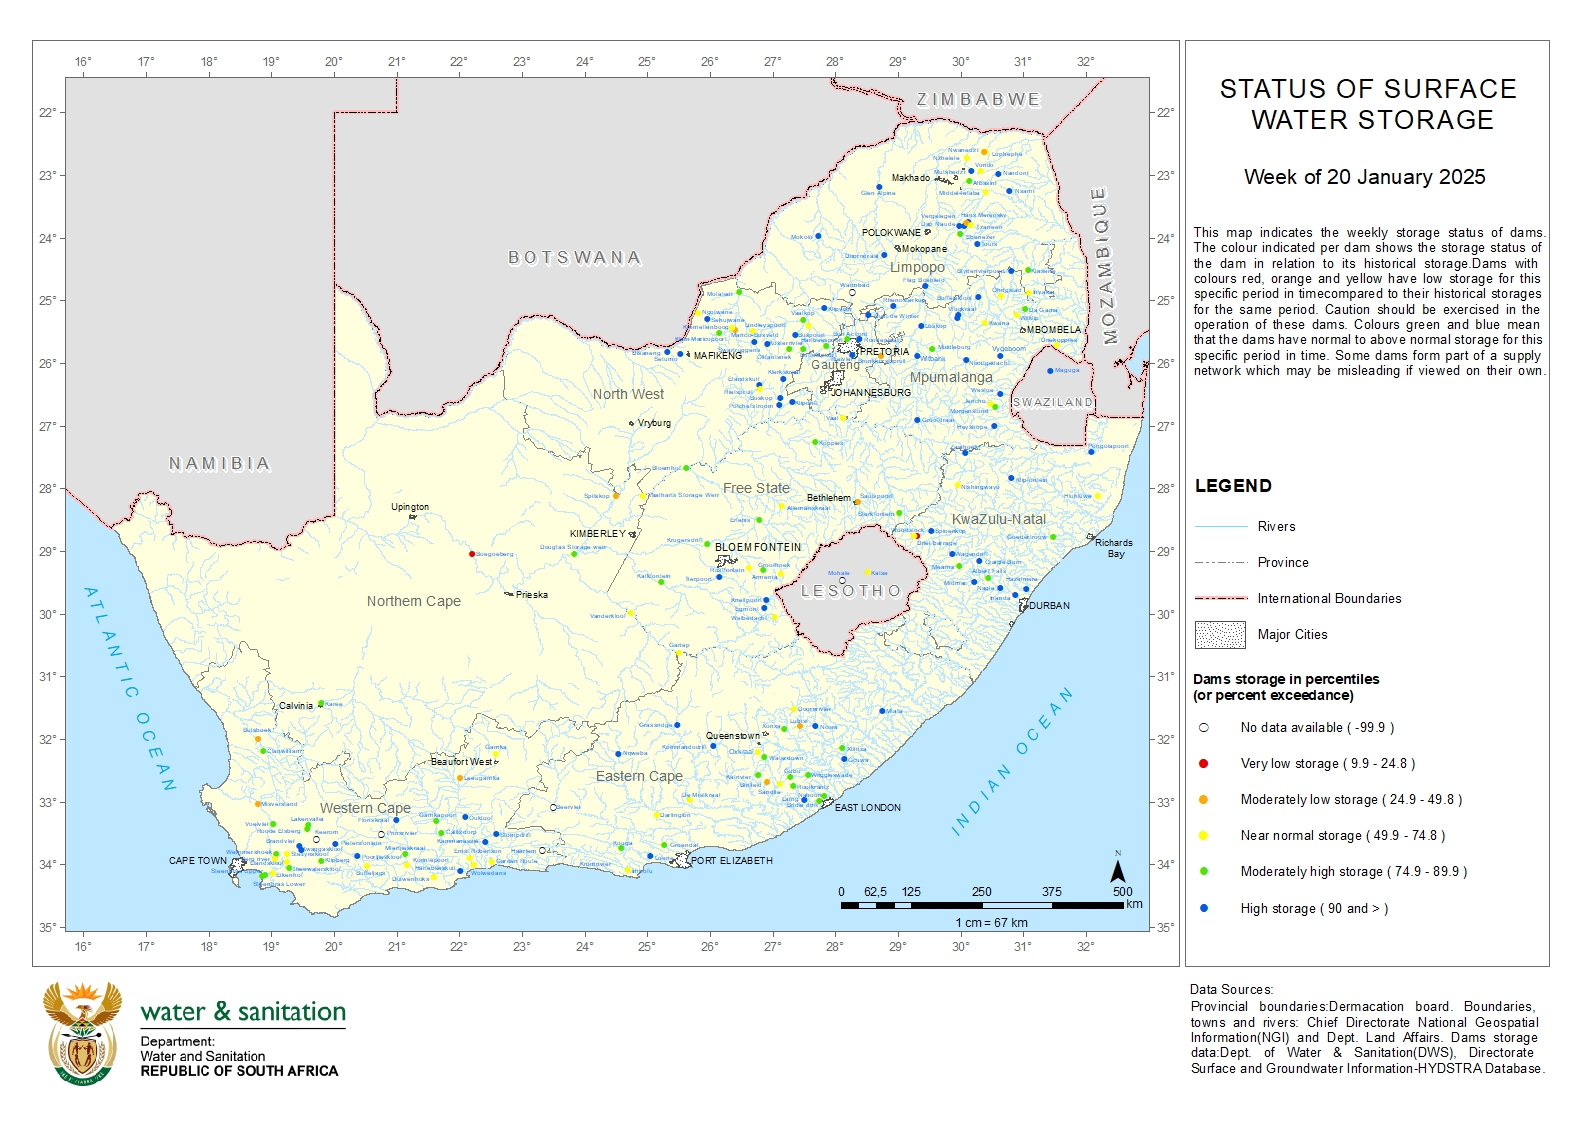
Now, this is exactly what I wanted! This map provides a bird’s-eye view of all the dams in the country. Each dam is represented by a colored dot that reflects its storage level:
- Very low storage: 0.0 - 24.8%
- Moderately low storage: 24.9 - 49.8%
- Near normal storage: 49.9 - 74.8%
- Moderately high storage: 74.9 - 89.9%
- High storage: 90% and above
From a quick glance, I can see that dam levels are excellent in the north (as expected, given that it’s the rainy season in summer) and moderate in the Western Cape (as expected, since its rainy season is in winter).
The Department of Water and Sanitation does offer some dashboards, but they could definitely market them better! It took some effort to locate them. For instance, the Surface Water Storage Dashboard looks like this:

This is incredibly cool! However, it brings me to my motivation for wanting to scrape their weekly data:
- I really enjoy the Status of Surface Water Storage report (the one with all the dots) as a way to visualize data. I wish this could be a fully interactive dashboard.
- All the reports share a limitation—they are updated weekly! I’d love to see the historical data behind these reports to analyze seasonal trends.
- I have already built the infrastructure to host my own Streamlit apps (see this blog post), and creating a dam-focused dashboard would be a great first Streamlit project!
What Do I Need to Build?
Here’s my plan:
- Data Scraping: I need a script to scrape the Weekly State of Dams page for data.
- Automation: This script should run automatically. Using AWS Lambda seems like the perfect solution, as it allows for a “deploy and forget” setup.
- Database: I want to store the data in a database without worrying too much about table structures. MongoDB’s NoSQL approach is ideal for this, and their free M0 cluster (512 MB of storage) should be sufficient. Although the storage capacity might seem small, it’s plenty for this purpose. Additionally, there are no costs for reads or writes, with the only limitation being 100 operations per second – more than enough for my needs.
- Deployment: To deploy this solution, I plan to use GitHub Actions and the Serverless Framework.
🐍 The Python Lambda Handler
As mentioned earlier, I’ll be using an AWS Lambda function to scrape the data. Every Lambda function requires an entry point, where AWS passes an event and context as arguments. These parameters provide the function with information about its invocation. In this case, I won’t be using them, but it’s useful to keep this in mind for future reference!
def lambda_handler(event, context):
    main()
I like to encapsulate all my logic within a main function. This approach simplifies testing, as I can easily call the main function locally:
# For local testing
if __name__ == "__main__":
    main()
Before diving into the details of the main() function, let’s take a look at how I set up the script!
📂 requirements.txt and requirements_for_local.txt
I never realized how powerful a requirements file could be! Did you know you can import one requirements file into another? I certainly didn’t! Why would we want to do this? Here’s an example:
The boto3 SDK is always available in a Python Lambda environment. This package is essential for interacting with AWS services. While it’s necessary for local development, we don’t need to include it in the final Lambda deployment package. Another example is the pytest package, which is only needed for local testing or GitHub Actions, not in the Lambda environment itself.
According to the AWS Lambda documentation, there’s a size limit for the deployment package:
250 MB – the maximum size of the unzipped deployment package, including all code and layers (such as Python packages).
This makes it crucial to manage space efficiently.
To address this, we use two separate requirements files:
requirements_for_local.txt: For local development and testing.requirements.txt: For the Lambda deployment.
Here’s what each file looks like:
The requirements.txt file contains only the dependencies required for the Lambda function:
beautifulsoup4==4.12.*
loguru==0.7.*
requests>=2.32.3
pymongo>=4.10.1
pytz
The requirements_for_local.txt file extends requirements.txt by including additional dependencies needed for local development:
# Load dependencies from requirements.txt
-r requirements.txt

boto3
How cool is that? When you run pip install -r requirements_for_local.txt, it installs everything from requirements.txt along with boto3! This setup ensures that your Lambda package stays lightweight while still allowing local developers to work with all the necessary tools.
🌍 Using AWS Secrets Manager to Manage Environment Variables
Since we’re already using AWS services, it makes sense to leverage a useful tool like AWS Secrets Manager. This service provides a secure location to store environment variables. If a service is authenticated to read from Secrets Manager, it can access these variables directly. This approach eliminates the need for local .env files, offering a centralized, secure repository for all environment variables.
For a detailed overview, refer to the AWS Secrets Manager documentation. It’s worth noting that Secrets Manager costs $0.40 per secret per month, so it’s wise to use it judiciously!
The get_secrets function is called when the script is loaded. It retrieves all secrets from Secrets Manager and loads them into the environment, enabling access via os.getenv:
get_secrets()
S3_BUCKET: str = os.getenv("S3_BUCKET")
This function primarily uses boilerplate code provided by AWS:
def get_secrets() -> None:
    logger.debug("Getting environment variables")

    # ===>> (1) Load secrets from AWS Secrets Manager
    session = boto3.session.Session()
    client = session.client(
        service_name='secretsmanager',
        region_name="us-east-1"
    )

    try:
        get_secret_value_response = client.get_secret_value(
            SecretId="sa-dam-dashboard"
        )
    except ClientError as e:
        raise e

    # ===>> (2) Parse secrets and set environment variables
    for k, v in json.loads(
        get_secret_value_response['SecretString']
    ).items():
        os.environ[k] = v
    logger.debug("Environment variables loaded")
The client.get_secret_value method retrieves the specified secret, along with associated metadata. The secrets are stored as a JSON string in the SecretString key. By using json.loads, we convert this string into a Python dictionary. Then, by looping through the key-value pairs, we load them into the environment using os.environ.
🥭 Mongo Client and Dam Metadata
Although the Weekly State of Dams page provides extensive information, it lacks the coordinates for each dam. To turn the surface water status report into a dashboard, we need these coordinates to properly visualize the data as map markers. This requires maintaining a separate database for dam metadata.
To connect to MongoDB, I use a wrapper class that simplifies initializing a connection. It builds the connection string and ensures it’s correctly encoded with urllib.parse.
class Mongo:
    def __init__(
        self,
        username: str,
        password: str,
        cluster: str,
        database: str,
    ) -> None:
        logger.debug("Connecting to Mongo...")
        self.client: MongoClient = MongoClient(
            f"mongodb+srv://{quote(username, safe='')}:{quote(password, safe='')}@{cluster}?retryWrites=true&w=majority"
        )
        self.db = self.client[database]
        logger.debug("Connected to Mongo!")


mongo: Mongo = Mongo(
    username=os.getenv("MONGO_USERNAME", ""),
    password=os.getenv("MONGO_PASSWORD", ""),
    cluster=os.getenv("MONGO_CLUSTER", ""),
    database=os.getenv("MONGO_DB", "")
)
This class allows me to easily access the MongoDB client (mongo.client) or the database (mongo.db). I use it for reading and writing data to the cluster.
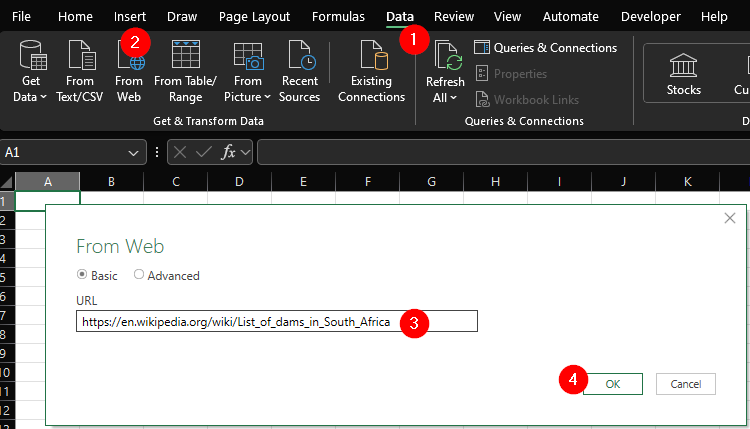
Where Does the Metadata Come From? I found a useful source: the List of dams in South Africa on Wikipedia. The table includes dam coordinates and some additional data, like the year of completion and wall height.
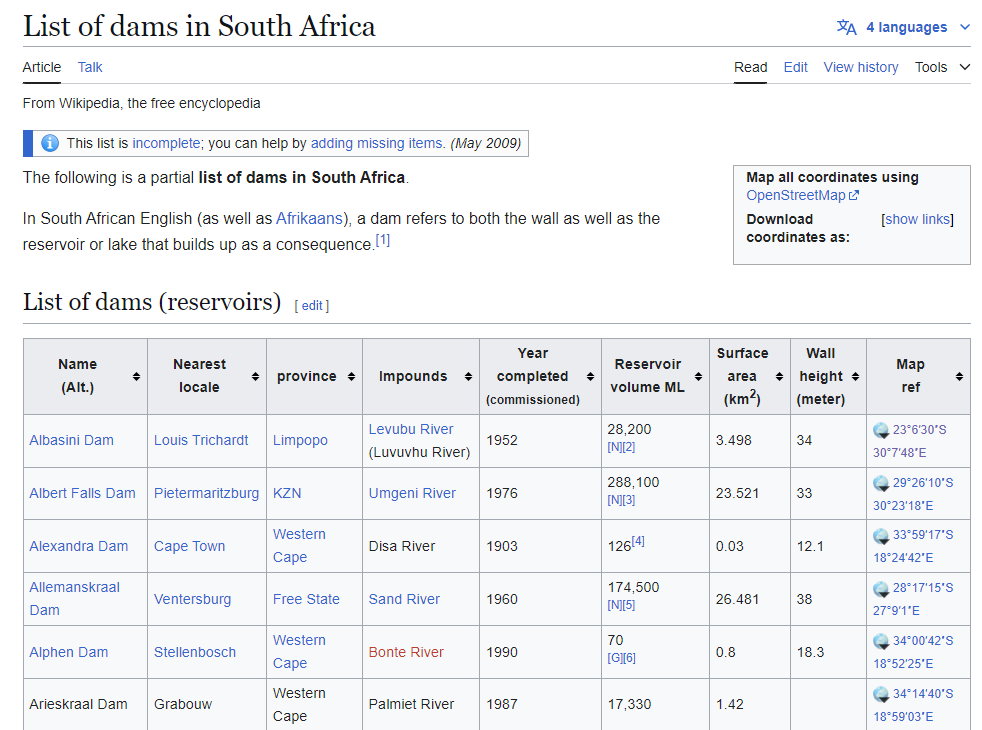
Since it’s a simple HTML table, I used Excel’s “Import Data from Web” feature to extract the data.
While this worked, the data required significant cleaning. Instead of manually cleaning it, I wrote an R script to automate the process for repeatability. Here’s an overview of the script:
cleaned_metadata <- read.csv(file.path(DATA_RAW_DIR, "dam_meta.csv"), encoding = "UTF-8") %>%
  janitor::clean_names() %>%
  as_tibble() %>%
  select(
    name_alt,
    nearestlocale,
    province,
    impounds,
    yearcompleted_commissioned,
    wallheight_meter,
    mapref
  ) %>%
  rename(
    name = name_alt,
    nearest_locale = nearestlocale,
    year_completed = yearcompleted_commissioned,
    wall_height_m = wallheight_meter,
  ) %>%
  mutate(
    lat_long = str_extract(mapref, "-?\\d+\\.\\d+; \\d+\\.\\d+"),
    lat = as.numeric(str_extract(lat_long, "^-?\\d+\\.\\d+")),
    long = as.numeric(str_extract(lat_long, "(?<=; )\\d+\\.\\d+")),
    name = case_when(
      # Example correction
      name == "Dap Naudé Dam" ~ "Dap Naude Dam",
      TRUE ~ name
    )
  ) %>%
  select(-mapref) %>%
  bind_rows(
    tibble(
      name = c("Hans Merensky Dam"),
      lat = c(-23.74769599038792),
      long = c(30.105186736810577)
    )
  )

write.csv(cleaned_metadata, file.path(DATA_PROCESSED_DIR, "meta.csv"), row.names=FALSE)
The script:
- Cleans column names.
- Extracts latitude and longitude.
- Renames and standardizes dam names.
- Adds missing rows manually for dams not listed on Wikipedia.
To ensure metadata completeness, I wrote the data_health_check function. It checks if each dam being scraped has metadata in the database:
def data_health_check(
    dam_data: List[List[str]],
    province_code: str
):
    province: str = PROVINCE_CODE_MAPPING[province_code]
    for row in dam_data:
        if row[0] not in DAM_META:
            logger.warning(f"[{province}] Dam metadata not found for {row[0]}")
        else:
            dam_meta: Dict = DAM_META[row[0]]
            if (
                not isinstance(dam_meta['lat'], (float, int)) or
                not isinstance(dam_meta['long'], (float, int))
            ):
                logger.warning(f"[{province}] Lat-long data not found for {row[0]}")
This function logs warnings for missing metadata, prompting me to manually add coordinates where necessary. For example, I used Google Maps’ satellite view to locate dams, such as the Belfort Dam (map link). By the way… just try to google Belfort Dam! Good luck!

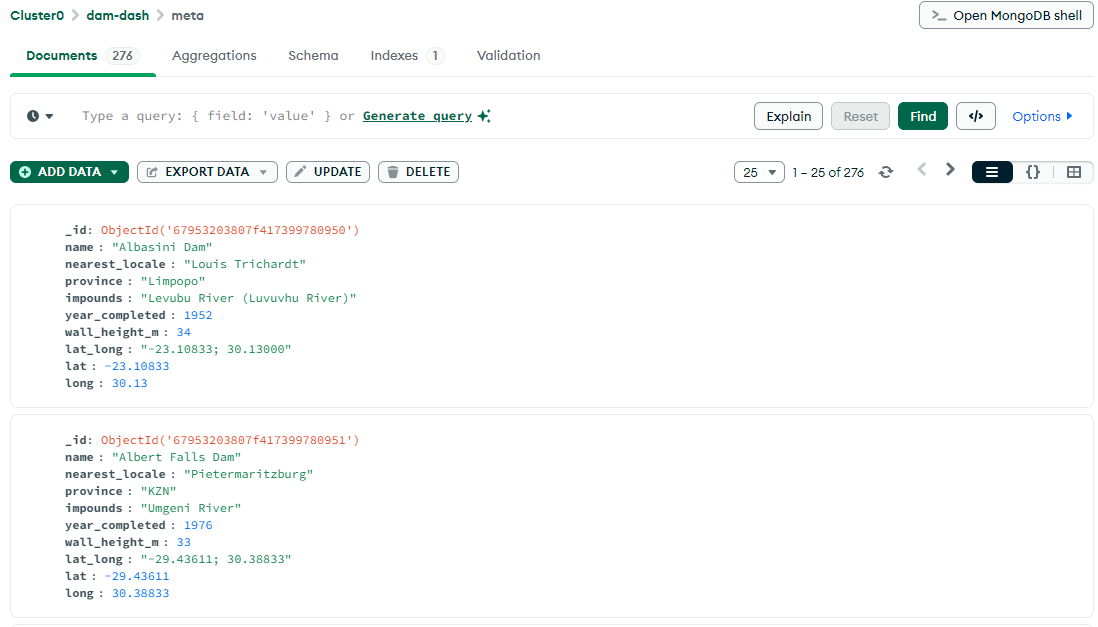
Once the metadata is ready, I upload it to MongoDB. The final database looks like this:
To load the metadata programmatically, I use the following function, which restructures the data into a dictionary for quick lookups:
def load_metadata() -> Dict[str, Dict]:
    logger.debug("Loading Dam Metadata...")
    metadata: List[Dict] = mongo.db['meta'].find({}, {"_id": 0})
    return {
        row['name']: row
        for row in metadata
    }

DAM_META: Dict[str, Dict] = load_metadata()
With this setup, I can seamlessly access dam metadata and integrate it into the dashboard.
Great! Setup complete! Now we can actually get the data!
🧠 The main Function: Orchestrating the Logic
The main function serves as the orchestrator for fetching, processing, and uploading dam data. Here’s a breakdown of its core responsibilities:
def main() -> None:
    logger.info("Starting dam data fetch...")

    data_set: List[DamData] = []
    try:
        # ==> STEP 1: GET THE DATA
        with concurrent.futures.ThreadPoolExecutor(
            max_workers=min(
                len(PROVINCE_CODE_MAPPING),
                (os.cpu_count() or 1) + 4
            )
        ) as executor:
            futures: List[concurrent.futures.Future] = [
                executor.submit(load_data, province_code)
                for province_code in PROVINCE_CODE_MAPPING.keys()
            ]
            for future in futures:
                data_set.extend(future.result())

        # ==> STEP 2: SET THE S3 LINK
        set_s3_link(
            data_set=data_set
        )

        # ==> STEP 3: UPLOAD THE DATA TO MONGO
        upload_to_mongo(
            data_set=data_set
        )

        # ==> STEP 4: DOWNLOAD THE PHOTOS AND UPLOAD TO S3 BUCKET
        process_dam_photos(
            data_set=data_set
        )
        logger.info("Done 🚀")
    except ReportExistsError:
        logger.warning("Execution stopped. Report already exists in Mongo!")
🛠 Steps in main:
-
Load the Data:
- Using the
ThreadPoolExecutor, theload_datafunction is called concurrently for each province, leveraging thePROVINCE_CODE_MAPPINGdictionary. TheThreadPoolExecutormakes it go fast! I also use a threading event,threading.Event(), to stop the other threads in case any of them fail. - Each call returns a
DamDatadataclass object, which is then appended to thedata_setlist.
- Using the
-
Generate S3 Links:
- Before uploading photos to S3, links are generated and added to the dataset. This ensures Mongo data references these links, even if photo uploads fail. There is a data priority: I would much rather make sure the Mongo data is uploaded.
-
Upload Data to MongoDB:
- Once the data has S3 links, it’s uploaded to MongoDB for storage and easy querying.
-
Download and Upload Photos to S3:
- Images for each dam are downloaded and uploaded to an S3 bucket. The bucket’s policy is configured for public access, allowing users to view these images directly.
Before I dive deeper, here are some important constants that I set at the top of the function:
REPORT_BASE_URL: str = "https://www.dws.gov.za/hydrology/Weekly/ProvinceWeek.aspx"

PROVINCE_CODE_MAPPING: Dict[str, str] = {
    "LP": "Limpopo",
    "M": "Mpumalanga",
    "G": "Gauteng",
    "NW": "North-West",
    "KN": "KwaZulu-Natal",
    "FS": "Free State",
    "NC": "Northern Cape",
    "EC": "Eastern Cape",
    "WC": "Western Cape"
}

HEADER_TABLE_ID: str = "ContentPlaceHolder1_twh"
DAM_LEVEL_TABLE_ID: str = "ContentPlaceHolder1_tw"
In addition to the constants, the DamData dataclass defines the schema for the dam data, providing a clear and structured way to manage and validate data.
@dataclass
class DamData:
    report_date: date = None
    province: str = ""
    dam: str = ""
    river: str = ""
    photo: str = ""
    s3_link: str = "#"
    full_storage_capacity: int = 0  # cubic meters
    this_week: int = 0
    last_week: int = 0
    last_year: int = 0
    scrape_datetime: datetime = datetime.now(pytz.timezone('Africa/Johannesburg'))
    nearest_locale: str = ""
    year_completed: str = ""
    wall_height_m: str = ""
    lat_long: List[float] = None
Each DamData object is uploaded to MongoDB as a document. Using a dataclass ensures consistency in structure and helps define the expected schema.
⚡Load data function
Let’s take a look at the function that performs the web scraping! Below is an overview of the load_data function, which is invoked by the ThreadPoolExecutor.
def load_data(
    province_code: str
) -> List[DamData]:
    try:
        # ==> STEP 1: CHECK IF THE EVENT IS SET
        if stop_event.is_set():
            return []

        # ==> STEP 2: LOAD THE HTML PAGE AS A SOUP CLASS
        soup: BeautifulSoup = get_soup(
            url=f"{REPORT_BASE_URL}?region={province_code}"
        )

        # ==> STEP 3: DETERMINE THE REPORT DATE
        report_date: date = fetch_report_date(soup)
        logger.info(f"Latest report date: {report_date}")

        # ==> STEP 4: VERIFY IF THE REPORT IS NEW AND NOT ALREADY IN MONGO
        if does_report_exist(report_date):
            logger.warning("Report already exists in MongoDB. Stopping execution.")
            raise ReportExistsError

        # ==> STEP 5: EXTRACT DATA FROM THE DAM TABLE
        dam_data: List[List[str]] = fetch_dam_data(soup)

        # ==> STEP 6: (OPTIONAL) PERFORM A DATA HEALTH CHECK
        if DATA_HEALTH_CHECK:
            data_health_check(
                dam_data=dam_data,
                province_code=province_code
            )

        # ==> STEP 7: CONVERT ALL ROWS INTO DAM DATA CLASSES USING LIST COMPREHENSION
        return [
            DamData(
                report_date=report_date,
                province=PROVINCE_CODE_MAPPING[province_code],
                dam=row[0],
                river=row[1],
                photo=f"https://www.dws.gov.za/Hydrology/Photos/{row[2].split('=')[1]}" if ".jpg" in row[2] else "",
                full_storage_capacity=to_numeric(row[4]) * 1e6,
                this_week=to_numeric(row[5]),
                last_week=to_numeric(row[6]),
                last_year=to_numeric(row[7]),
                nearest_locale=str(DAM_META.get(row[0], {}).get("nearest_locale", "NA")),
                year_completed=str(DAM_META.get(row[0], {}).get("year_completed", "NA")),
                wall_height_m=str(DAM_META.get(row[0], {}).get("wall_height_m", "NA")),
                lat_long=[
                    DAM_META.get(row[0], {}).get("lat"),
                    DAM_META.get(row[0], {}).get("long")
                ]
            )
            for row in dam_data
        ]
    except Exception as e:
        logger.error("An error occurred. Stopping all other workers.")
        stop_event.set()
        raise e
Seven Steps in Detail 🔨
- Check if the
threading.Event()is set: Continue only if the event is not set by another worker. If the event is set, it indicates that another worker has encountered a problem. This ensures an “all-or-nothing” approach to the scraping process. - Load the HTML page as a Soup class: The HTML page is loaded as a
BeautifulSoupobject using the URLf"{REPORT_BASE_URL}?region={province_code}". - Determine the report date: Use regular expressions to extract the report date from the HTML content.
- Verify if the report is new and not already in MongoDB: Although the current implementation prevents overwriting existing data, a future enhancement could include this validation logic to stop execution when the report already exists.
- Extract data from the dam table: Fetch rows from the province’s report table.
- (Optional) Perform a data health check: If enabled, run a health check to validate the integrity of the data for the given province.
- Convert rows into DamData classes using list comprehension: Initialize
DamDatainstances for each row by extracting and transforming relevant information.
The get_soup makes some good soup 🥣. It’s very simple, it just sends a get request to the website and parses the HTML (response.text) using BeautifulSoup
def get_soup(
    url: str
) -> BeautifulSoup:
    try:
        response: requests.Response = requests.get(
            url,
            timeout=DEFAULT_TIMEOUT
        )
        response.raise_for_status()
    except requests.exceptions.RequestException as e:
        logger.error(f"Error fetching the URL: {e}")
        raise e

    return BeautifulSoup(
        response.text,
        'html.parser'
    )
We can now pass this BeautifulSoup class to the fetch_report_date function that will parse the top table (which reports the date)
def fetch_report_date(
    soup: BeautifulSoup,
    header_id: str = HEADER_TABLE_ID
) -> List[List[str]]:
    logger.debug("Fetching report Date")
    header_data: element.Tag = soup.find(
        'table',
        attrs={
            'id': header_id
        }
    )

    header: List[List[str]] = []
    header_rows: element.ResultSet = header_data.find_all('tr')
    for row in header_rows:
        cols: element.ResultSet = row.find_all(['td', 'th'])
        cols: List[str] = [ele.get_text(strip=True) for ele in cols]
        if cols:
            header.append(cols)
    return get_date(header[0][0])
The get_date then takes the row that usually (haha) has the reporting date and passes it to get_date. This function uses Regex to extract the date and convert it to a datetime.date object.
def get_date(
    text: str
) -> date:
    date: re.Match = re.search(r"\d{4}-\d{2}-\d{2}", text)
    if date:
        return datetime.strptime(
            date.group(),
            DEFAULT_DATE_FORMAT
        ).date()
    else:
        raise RuntimeError("Could not extract date")
Currently, does_report_exist doesn’t do much, so we’ll skip that for now. The fetch_dam_data function also takes the same BeautifulSoup class as an input argument. The difference here is that if it encounters an a-tag, it extracts the href instead of the text. This will be the link to the photo.
def fetch_dam_data(
    soup: BeautifulSoup,
    table_id: str = DAM_LEVEL_TABLE_ID
) -> List[List[str]]:
    table: element.Tag = soup.find(
        'table',
        attrs={
            'id': table_id
        }
    )

    data: List[List[str]] = []
    rows: element.ResultSet = table.find_all('tr')
    for row in rows:
        cols: element.ResultSet = row.find_all(['td', 'th'])
        cols: List[str] = [
            ele.find('a')['href'] if ele.find('a') else ele.get_text(strip=True)
            for ele in cols
        ]
        if cols:
            data.append(cols)

    return data[1:-1]  # Remove header and footer
The set_s3_link simply loops over the data and sets the s3_link
def get_s3_key(
    dam_data: 'DamData'
) -> str:
    return f"{dam_data.report_date}/{dam_data.province}/{dam_data.dam}.jpg"

def get_s3_link(
    dam_data: 'DamData'
) -> str:
    return f"https://{S3_BUCKET}.s3.amazonaws.com/{quote(get_s3_key(dam_data))}"

def set_s3_link(data_set: List['DamData']):
    for dam_data in data_set:
        dam_data.s3_link = get_s3_link(dam_data)
The upload_to_mongo function is used to upload the data to Mongo. Here I use the bulk_write method along with UpdateOne to bulk upsert the data.
def upload_to_mongo(
    data_set: List['DamData']
) -> None:
    logger.debug("Uploading to Mongo")

    operations: List[UpdateOne] = []
    for dam_data in data_set:
        serialized_data: Dict[str, Any] = {
            key: convert_to_serializable(value)
            for key, value in dam_data.__dict__.items()
        }
        unique_id: str = generate_unique_id(dam_data)
        serialized_data["_id"] = unique_id

        operations.append(
            UpdateOne(
                {"_id": unique_id},
                {"$set": serialized_data},
                upsert=True
            )
        )

    try:
        results = mongo.db['reports'].bulk_write(operations)
        logger.debug(f"Finished uploading {len(operations)} records to Mongo")
        logger.info(
            f"Summary:"
            f"Deleted: {results.deleted_count}; "
            f"Inserted: {results.inserted_count}; "
            f"Matched: {results.matched_count}; "
            f"Modified: {results.modified_count}; "
            f"Upserted: {results.upserted_count}; "
        )
    except Exception as e:
        logger.error(f"Error uploading to MongoDB: {e}")
Note the use of generate_unique_id to generate a unique Id. The Id is generated using a hash of the data that makes the document unique. That way, we’ll never have duplicate data in the system! It was important to remove the scrape_datetime property since that will, of course, always be unique! haha!
def generate_unique_id(dam_data: 'DamData'):
    dam_copy: Dict = copy.deepcopy(dam_data.__dict__)
    dam_copy.pop('scrape_datetime')  # Remove the thing that keeps making it unique!
    hashable_content = str(dam_copy)
    return hashlib.sha256(hashable_content.encode()).hexdigest()
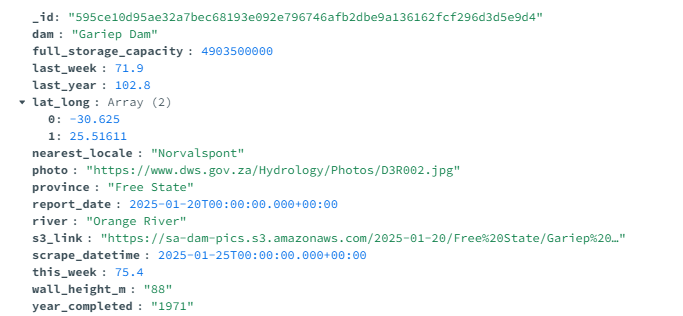
Here is an example of what the uploaded data will look like in Mongo!
Want to see something cool about the s3 link? Here is a picture of the Gariep Dam, but this time, we’re using the image I downloaded into S3. Click here to download it from the bucket directly!

On that note, the last step is to download the image and upload it to S3. This is done using process_dam_photos:
def process_dam_photos(
    data_set: List['DamData']
) -> None:
    logger.debug("Uploading Photos to S3...")
    if not S3_BUCKET:
        raise EnvironmentError("S3_BUCKET environment variable is not set.")

    # ====> STEP 1: OPEN AN S3 CLIENT
    s3_client = boto3.client("s3")
    uploaded_counter: int = 0
    already_exist_counter: int = 0

    # ====> STEP 2: USE THE TEMPDIR CONTEXT MANAGER TO CREATE A TEMPORARY DIRECTORY FOR THE DOWNLOADED IMAGES
    with tempfile.TemporaryDirectory() as temp_dir:
        for dam_data in data_set:
            if dam_data.photo:
                try:
                    # ====> STEP 3: DOWNLOAD THE IMAGE
                    response: requests.Response = requests.get(dam_data.photo)
                    response.raise_for_status()

                    province_dir: str = os.path.join(temp_dir, dam_data.province)
                    os.makedirs(province_dir, exist_ok=True)

                    photo_path: str = os.path.join(province_dir, f"{dam_data.dam}.jpg")

                    with open(photo_path, "wb") as file:
                        file.write(response.content)

                    # ====> STEP 4: UPLOAD THE IMAGE TO S3 IF IT DOES NOT ALREADY EXIST
                    s3_key: str = get_s3_key(dam_data)
                    if not s3_key_exists(
                        s3_client=s3_client,
                        s3_key=s3_key
                    ):
                        s3_client.upload_file(
                            photo_path,
                            S3_BUCKET,
                            s3_key
                        )

                        uploaded_counter += 1
                    else:
                        already_exist_counter += 1

                except requests.RequestException as e:
                    logger.warning(f"Failed to download photo for dam {dam_data.dam}: {e}")
                except boto3.exceptions.S3UploadFailedError as e:
                    logger.warning(f"Failed to upload photo for dam {dam_data.dam} to S3: {e}")
                except Exception as e:
                    logger.critical(f"Unexpected Error: {e}")

    logger.debug(f"Finished uploading {uploaded_counter} images. {already_exist_counter} already existed")
There are a lot of steps involved in this function, but it boils down to 4 primary steps:
- Create a client that can talk to S3
- Create a temporary directory where we’ll download all the images
- Download the image using a similar folder structure that we’ll use for our S3 upload. The dams will be stored per province.
- We upload the data to S3 only if it does not already exist in S3. We can check this by defining a
s3_key_existsfunction (thanks Stackoverflow!)
def s3_key_exists(
    s3_client: object,
    s3_key: str
) -> bool:
    try:
        s3_client.head_object(
            Bucket=S3_BUCKET,
            Key=s3_key
        )
    except ClientError as e:
        return int(e.response['Error']['Code']) != 404
    return True
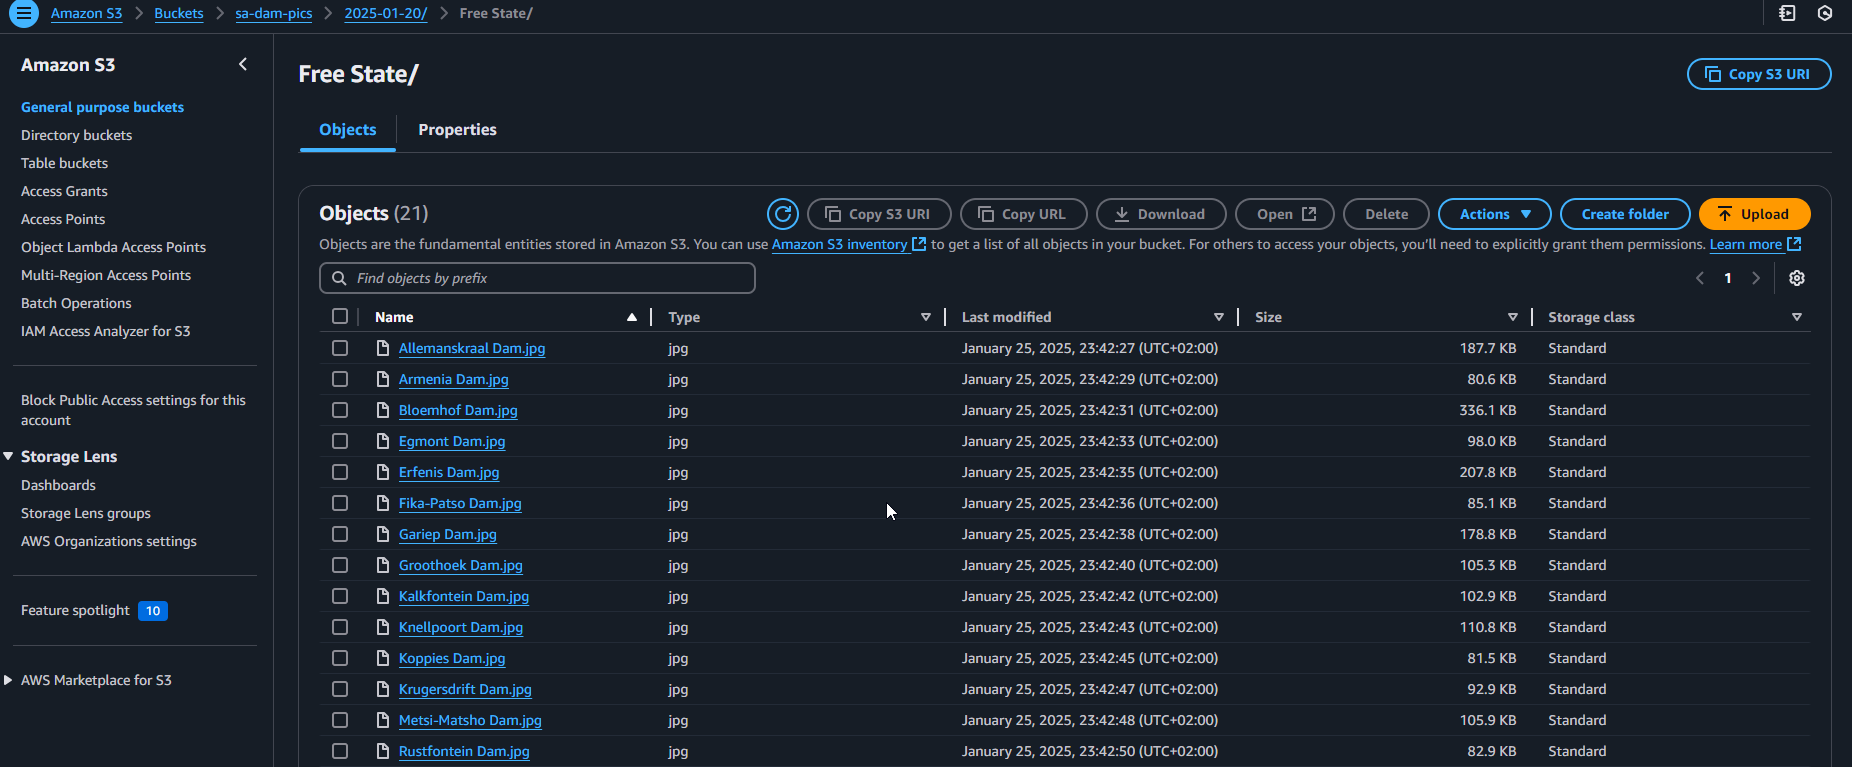
Here’s a look at all the Dam Pictures in S3!
Of course, if these pictures are not unique, it will be easy to disable the download and upload to S3.
💻 Serverless Deployment
The Serverless framework is pretty cool! You can have a deeper dive in their documentation, but essentially, under the hood, they use Cloudformation to deploy serverless services. I my case I need the following:
- I need the Lambda function itself
- I need a
serverless-python-requirementsplugin to install the Python dependencies - I need IAM permissions for the Lambda to read secrets from the secrets manager and to write to an S3 Bucket
- I want the lambda to be triggered by a CRON schedule. In my case, I set the CRON to
cron(0 6 ? * 3 *), which means Tuesdays 08:00 am (SAST)
service: ${env:PROJECT_NAME}-backend

plugins:
  - serverless-python-requirements

frameworkVersion: '3'

custom:
  pythonRequirements:
    dockerizePip: false
    usePoetry: false
    useDownloadCache: false
    useStaticCache: false
    slim: true
    pipCmdExtraArgs:
      - --platform manylinux2014_x86_64
      - '--only-binary=:all:'
      - '--python-version=${env:PYTHON_VERSION}'
    compatibleRuntimes:
      - python${env:PYTHON_VERSION}

provider:
  name: aws
  region: ${env:AWS_DEFAULT_REGION}
  architecture: x86_64
  tags:
    Env: ${opt:stage}
    Project: ${env:PROJECT_NAME}
    Resource_Type: lambda_function
  iam:
    role:
      statements:
        - Effect: Allow
          Action:
            - secretsmanager:GetSecretValue
          Resource: arn:aws:secretsmanager:us-east-1:303156412026:secret:sa-dam-dashboard-3t05zW
        - Effect: Allow
          Action:
            - s3:GetObject
            - s3:ListBucket
            - s3:PutObject
          Resource:
            - arn:aws:s3:::sa-dam-pics
            - arn:aws:s3:::sa-dam-pics/*

functions:
  sa-dam-data:
    handler: lambda_function.lambda_handler
    disableLogs: false
    logRetentionInDays: 14
    runtime: python${env:PYTHON_VERSION}
    memorySize: 512
    ephemeralStorageSize: 512
    timeout: 600
    name: ${self:service}-${opt:stage}
    description: Backend lambda for ${env:PROJECT_NAME}
    events:
      - schedule:
          rate: cron(0 6 ? * 3 *) # 08:00 am SAST is 06:00 UTC
          enabled: true
And finally, I use Github Actions to deploy it:
name: Lambda Deploy

on:
  workflow_dispatch:
    inputs:
      environment:
        description: 'Environment to deploy to'
        required: true
        default: 'production'
        type: choice
        options:
        - production

env:
  PROJECT_NAME: ${{ vars.PROJECT_NAME }}
  PYTHON_VERSION: ${{ vars.PYTHON_VERSION }}
  AWS_DEFAULT_REGION: ${{ vars.AWS_DEFAULT_REGION }}
  AWS_ACCESS_KEY_ID: ${{ secrets.AWS_ACCESS_KEY_ID }}
  AWS_SECRET_ACCESS_KEY: ${{ secrets.AWS_SECRET_ACCESS_KEY }}

jobs:
  deploy-production:
    name: Deploy to Production
    if: ${{ github.event.inputs.environment == 'production' }}
    runs-on: ubuntu-latest
    strategy:
      matrix:
        node-version: [18.x]
    steps:
      - uses: actions/checkout@v3
      - name: Use Node.js ${{ matrix.node-version }}
        uses: actions/setup-node@v3
        with:
          node-version: ${{ matrix.node-version }}
      - name: Set up Python ${{ vars.PYTHON_VERSION }}
        uses: actions/setup-python@v5
        with:
          python-version: ${{ vars.PYTHON_VERSION }}
      - name: serverless deploy production
        uses: serverless/[email protected]
        with:
          args: -c "serverless plugin install --name serverless-python-requirements && serverless deploy -s prod"
          entrypoint: /bin/sh
📊 Plotting the Results
Now we can use the data to make amazing plots!

🥐 Conclusions
This was a fun one to make! It uses a lot of the AWS services. With this, the data can be used to make a very interesting dashboard! Thanks for reading!
A link to the source code: sa-dam-data lambda