Game of Life using p5.js
The Game of Life—a simple yet beautiful cellular automaton devised by British mathematician John Horton Conway in 1970—is truly fascinating! The game, as shown above, is running in real-time within this blog post. The version you see is unique to your browsing session, meaning we will likely never see the exact same game ever again! How? The embedded game is an iFrame linked to this website: https://gol.happybread.net/.
Try visiting the website or refreshing this page to play again. Each refresh generates a new random starting state, making it a zero-player game—meaning it evolves automatically based on its initial conditions. All you have to do is watch as the game unfolds before your eyes.
Rules
According to this Wikipedia entry, the Game of Life is played on a two-dimensional grid made up of cells. Each cell can be in one of two states: alive or dead (or, more intuitively, populated or unpopulated).
Every cell interacts with its eight neighboring cells.
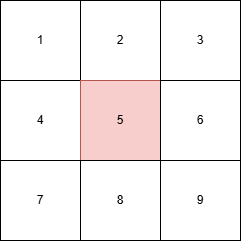
For example, in the grid above, we focus on cell number 5 and its eight surrounding neighbors. At each time step, one of four possible outcomes occurs:
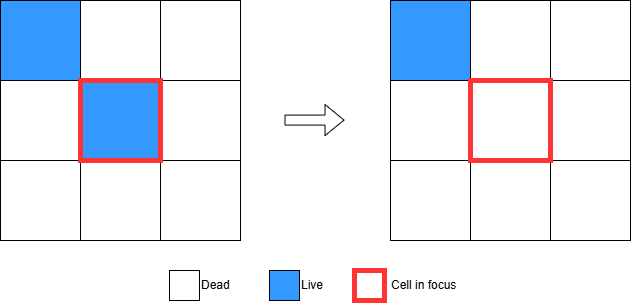
1. Any live cell with fewer than two live neighbours dies, as if by underpopulation.
In the example below, the cell in focus has only one live neighbor in the top-left cell. According to this rule, the cell will die.
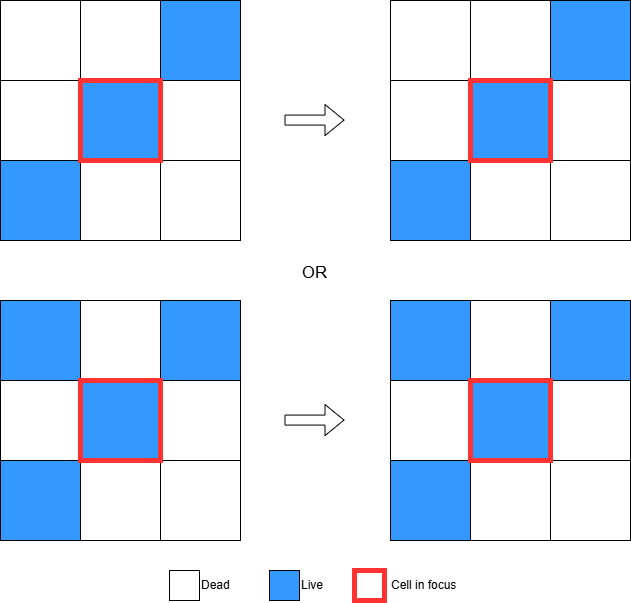
2. Any live cell with two or three live neighbours lives on to the next generation.
Below are two examples: in the first, the cell in focus has two live neighbors; in the second, it has three. In both cases, the cell in focus (which is currently alive) will continue to live in the next generation.
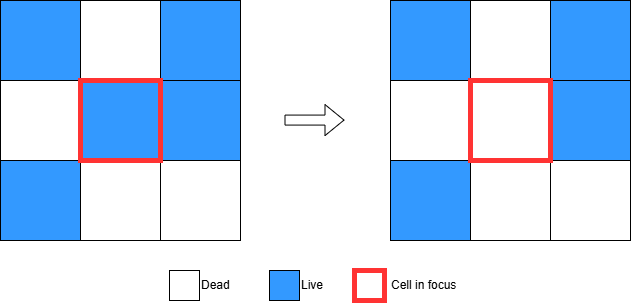
3. Any live cell with more than three live neighbours dies, as if by overpopulation.
In the example below, the cell in focus (which is currently alive) has four live neighbors. According to this rule, the cell must die.
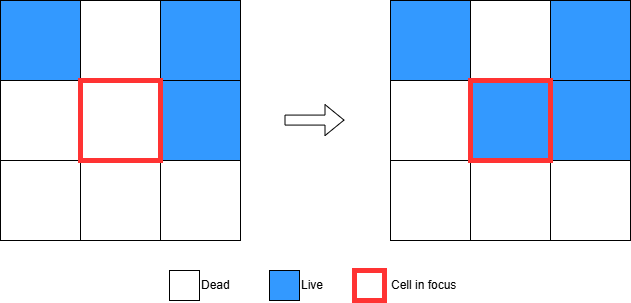
4. Any dead cell with exactly three live neighbours becomes a live cell, as if by reproduction.
In the example below, the cell in focus (which is currently dead) is surrounded by three live neighbors. It will be resurrected!
p5.js processing library
The rules of Conway’s Game of Life are simple, yet visualizing them in action requires the right tools. That’s where p5.js comes in! p5.js is an open-source JavaScript library designed to make coding accessible and expressive, especially for creative projects on the web. It provides an intuitive way to generate interactive graphics, animations, and data visualizations, even for those with little to no programming experience.
What makes p5.js stand out?
- Beginner-Friendly: With its simplified syntax, p5.js serves as a welcoming introduction to coding, particularly for artists and designers.
- Real-Time Visual Feedback: The library is built around graphical output, allowing users to immediately see the effects of their code.
- Community-Driven & Open Source: Since p5.js is open-source, it’s free to use and backed by a thriving community eager to share ideas, inspiration, and support.
With p5.js, bringing the Game of Life to life (pun intended) becomes an engaging and interactive experience. Whether you’re experimenting with different starting conditions or tweaking visual styles, this library makes creative coding more accessible than ever!
Getting started with p5.js is as simple as making an index.html that looks something like this:
<!DOCTYPE html>
<html>

<head>
    <script src=
"https://cdn.jsdelivr.net/npm/[email protected]/lib/p5.js">
    </script>
</head>

<body>
    <script>
        function setup() {

            // Canvas size 400*400
            createCanvas(400, 400);
        }

        function draw() {

            // Background color blue
            background('blue');
        }
    </script>
</body>

</html>
But I actually prefer using the VS Code extension to quickly create a project.
There are two important functions: setup and draw. setup is used to initialize your drawing space. In this case, we start a 2D canvas. We can do various other things in the setup, but more on that later. Next, we have a draw function. This function runs in a loop according to the frame rate of the animation. That’s the basics of it. You can read more about it at https://p5js.org .
Consider this example of making a recursive tree by Daniel Shiffman. It renders a simple tree-like structure via recursion. The branching angle is calculated as a function of the horizontal mouse location. Move the mouse left and right to change the angle (full screen mode available here: https://rt.happybread.net )
/**
 * Recursive Tree
 * by Daniel Shiffman.
 *
 * Renders a simple tree-like structure via recursion.
 * The branching angle is calculated as a function of
 * the horizontal mouse location. Move the mouse left
 * and right to change the angle.
 */

float theta;

void setup() {
  size(640, 360);
}

void draw() {
  background(0);
  frameRate(30);
  stroke(255);
  // Let's pick an angle 0 to 90 degrees based on the mouse position
  float a = (mouseX / (float) width) * 90f;
  // Convert it to radians
  theta = radians(a);
  // Start the tree from the bottom of the screen
  translate(width/2,height);
  // Draw a line 120 pixels
  line(0,0,0,-120);
  // Move to the end of that line
  translate(0,-120);
  // Start the recursive branching!
  branch(120);

}

void branch(float h) {
  // Each branch will be 2/3rds the size of the previous one
  h *= 0.66;

  // All recursive functions must have an exit condition!!!!
  // Here, ours is when the length of the branch is 2 pixels or less
  if (h > 2) {
    pushMatrix();    // Save the current state of transformation (i.e. where are we now)
    rotate(theta);   // Rotate by theta
    line(0, 0, 0, -h);  // Draw the branch
    translate(0, -h); // Move to the end of the branch
    branch(h);       // Ok, now call myself to draw two new branches!!
    popMatrix();     // Whenever we get back here, we "pop" in order to restore the previous matrix state

    // Repeat the same thing, only branch off to the "left" this time!
    pushMatrix();
    rotate(-theta);
    line(0, 0, 0, -h);
    translate(0, -h);
    branch(h);
    popMatrix();
  }
}
Creating the Game of Life using p5.js
Now that we have an overview of the Game of Life and how p5.js can help visualize it, let’s break down the JavaScript code that brings it to life.
Global Variables
The program starts by defining key variables:
let grid;
let cols;
let rows;
let resolution = 20;
- grid: A 2D array representing the game board.
- cols and rows: Define the number of columns and rows in the grid, calculated based on the canvas size.
- resolution: The size of each cell in pixels.
Creating the Grid
To store the game state, we need a 2D array:
/**
 * Sets the grid size (cols and rows) as well as the initial 2D array given a resolution
*/
function setGridSize(){
  cols = int(width / resolution);
  rows = int(height / resolution);
  grid = make2DArray(cols, rows);
}
This function generates a 2D array with the specified dimensions, which will later be filled with values representing live or dead cells.
Setting Up the Grid
The setGridSize function determines the grid size based on the canvas dimensions and initializes it:
function setGridSize() {
  cols = int(width / resolution);
  rows = int(height / resolution);
  grid = make2DArray(cols, rows);
}
Initializing the Grid with Random States
The initGrid function fills the grid with random 0s (dead) and 1s (alive):
/**
 * Initializes the 2D grid array with a random set of values between 0 an 1
 * 0 is dead and 1 is alive.
*/
function initGrid(){
  for (let i = 0; i < cols; i++){
    for (let j = 0; j < rows; j++){
      // random number between 0 and up to (but not including) 2
      // floor to make it a number between 0 and 1
      grid[i][j] = floor(random(2));
    }
  }
}
Rendering the Grid
The renderCurrentState function loops through the grid and draws each cell:
/**
 * A function that will render the current the current `grid` state.
 * It simply loops over the 2D Array and plots a white square if the value is
 * set to 1. The resolution is used to determine the starting and ending positions of
 * the squares to render.
*/
function renderCurrentState() {
  for (let i = 0; i < cols; i++){
    for (let j = 0; j < rows; j++){
      let x = i * resolution;
      let y = j * resolution;
      if (grid[i][j] == 1){
        fill(255);
        stroke(0);
        rect(x, y, resolution - 1, resolution - 1);
      }
    }
  }
}
This function colors live cells white and draws black-bordered squares to represent them.
Counting Neighbors
To determine the next state, we count live neighbors using:
/**
 * Given a grid, and a center point (index coordinates in the 2D array), this function will sum
 * all of the neighbors in around the center point. The edges will wrap-around to the other side.
 *
 * @param {Array<Array<number>>} gird - a grid with a minimum size of 3 x 3
 * @param {number} x - a column index position in the grid
 * @param {number} y - a row index position in the grid
*/
function countNeighbors(grid, x, y){
  let sum = 0;
  for (let i = -1; i < 2; i++){
    for (let j = -1; j < 2; j++){
      let col = (x + i + cols) % cols;
      let row = (y + j + rows) % rows;
      sum += grid[col][row];
    }
  }
  sum -= grid[x][y];
  return sum
}
This function checks all eight neighboring cells, using a wrap-around method to handle edge cases. If you’re wondering how this “wrap around” works, I highly recommend watching this video by Golan Levin: https://www.youtube.com/watch?v=r5Iy3v1co0A
He shows how to use the modulo operator for periodic motion!
Running the Simulation
The draw function executes the rules of the Game of Life in each frame:
function draw() {
  background(0);
  renderCurrentState();

  // Create a clean slate
  let next = make2DArray(cols, rows);

  for (let i = 0; i < cols; i++){
    for (let j = 0; j < rows; j++){

      // =====>> Get params for current state
      let neighbors = countNeighbors(grid, i, j)
      let currentState = grid[i][j];

      // =====>> Currently dead, but 3 live neighbors, set to alive
      if (currentState == 0 && neighbors == 3){
        next[i][j] = 1

      // =====>> Kill there is less than 2 or more than three neighbors
      } else if (currentState == 1 && (neighbors < 2 || neighbors > 3)){
        next[i][j] = 0;

      // =====>> Else, do nothing
      } else {
        next[i][j] = currentState;
      }
    }
  }

  // Update the current state to the next state
  grid = next;
}
It’s that simple!
You can find a link to the source code here